← All raids

The Desert Perpetual

Released
Location
Kepler
Power
450 / 350Combatant / Activity
Title
Atemporal

Normal-mode clear guideSource review:

Choose the route. Assign the jobs.

Predestination: the hub

For a first full clear, complete Epoptes, Iatros, and Agraios in any order, returning to the hub between branches. Then face Koregos. The order below is this guide’s teaching route.

This walkthrough covers Normal. Epic changes the encounters and replaces the final fight; use the Epic guide for that version.

Destinypedia · raid overview and walkthrough · Shacknews · raid walkthrough

Before anyone starts

  • Assign every role by player name and choose one person to lead countdowns.
  • Point out landmarks together. A ring number or “left” is useful only when everyone means the same thing.
  • Agree who covers a missing role after a death. Say the handoff aloud.
  • Use this page as a shared briefing: read the sequence, then open recovery notes when diagnosing a failed attempt.

Jump to your encounter

01 / HYDRA

Epoptes, Lord of Quanta

Dismantle both side-room Lenses, then keep the central boss vulnerable.

Back to encounter list ↑
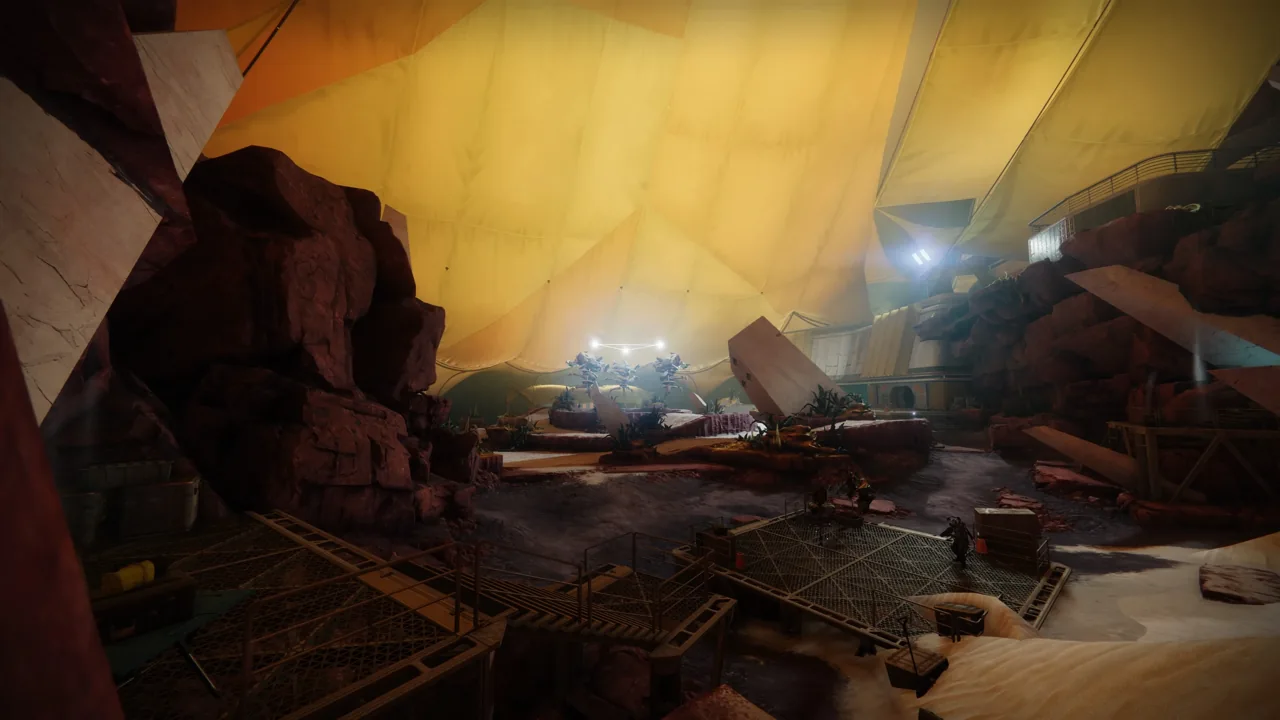
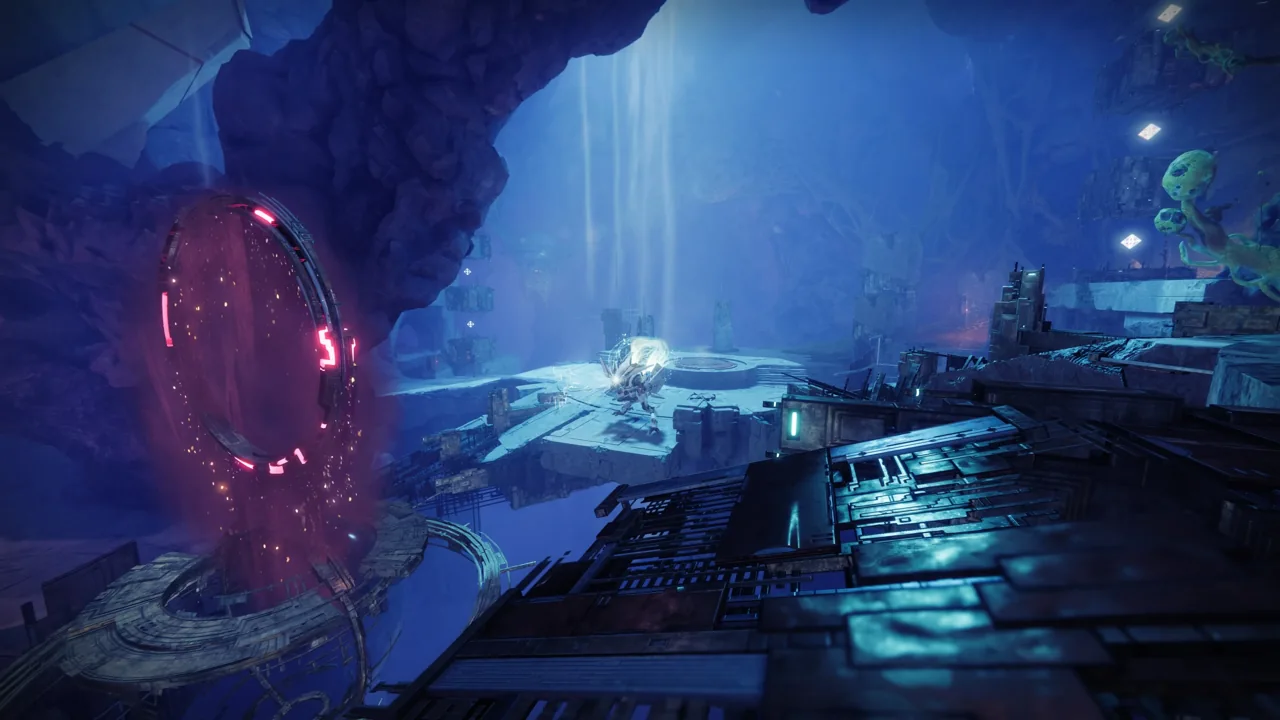
Epoptes: hydra arena
Epoptes: hydra arenaBungie · Destinypedia

Maps & diagrams

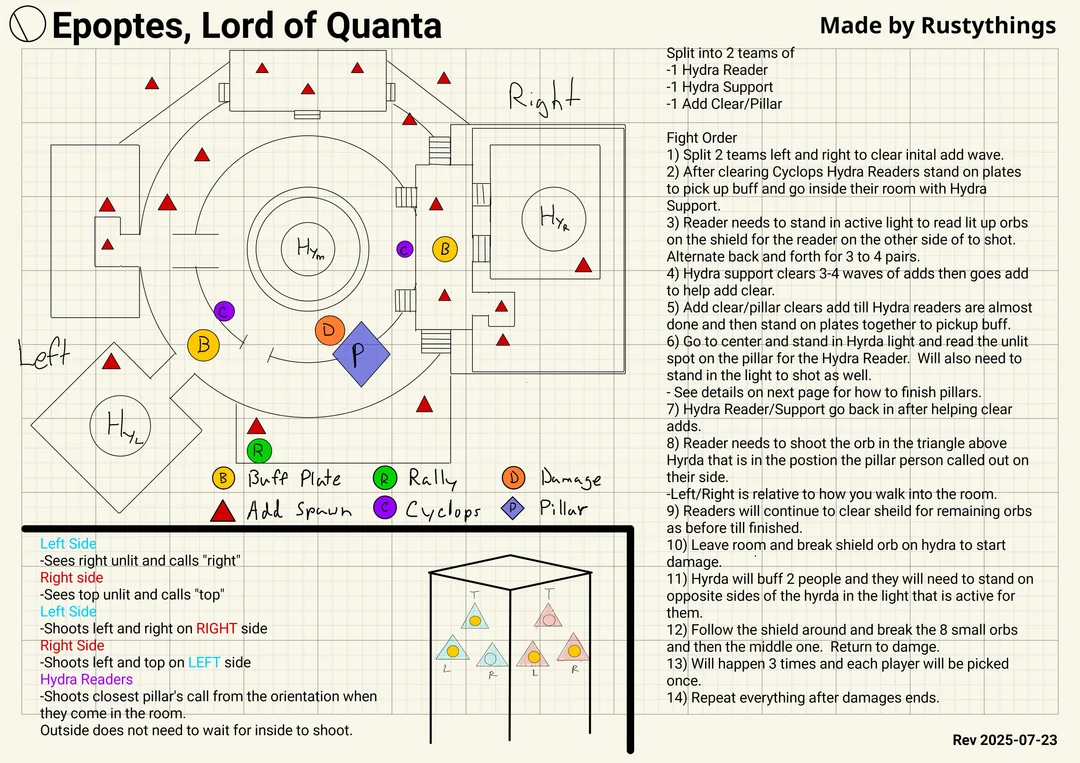
Epoptes arena map, roles and fight order
Epoptes arena map, roles and fight orderMap: Rustythings (via Reddit)

Encounter sequence

  1. Open the rooms

    Kill both Time’s Magistrate Cyclopses. The side readers take their plates together, gain Temporality, and enter with their helpers.

  2. Exchange eyes

    Stand in the Lens’s projected light to hold your timer. Read your display; the opposite reader shoots that position on their own shield. Agree on six clock positions before pulling. Pause after three eyes until middle confirms readiness; the fourth advances the mechanic.

  3. Resolve the triangle

    Kill the next Cyclopses. Middle readers take the available buffs and enter Epoptes’s light. Each calls the unlit triangle position to their own side room. That side reader shoots the corresponding floating sphere above their Lens, facing from the doorway. Each middle reader also destroys the other two positions on their central display, leaving the other middle reader’s called position untouched.

  4. Finish the Lenses

    Kill the new Cyclopses and refresh side buffs after collapse. Cross-call the remaining outer eyes, then destroy each Lens’s center eye. Return to middle and break the central shield eyes to open damage.

  5. Extend damage

    Watch the feed for the two selected players. Both follow their shield’s light, destroy its six outer eyes, then its center. Everyone will take a turn across three pairs. Repeat the encounter loop if Epoptes survives.

If the attempt breaks down
  • Eyes return. Check the opposite reader’s call before firing again.
  • Damage becomes immune. The selected pair must reach and follow their projected light.
Optional challenge: Encounter Challenges feat
  • No Guardian may destroy two consecutive outer Lens eyes during the mechanic. Assign two shooters to each Lens and alternate.
  • Only when the fireteam leader selects the Encounter Challenges feat before launch; a mistake wipes the team.

Challenge references: Vaexil · Normal-mode guide · Destinypedia · raid overview and walkthrough

Loot from this encounter
Weapons
  • Opaque HourglassCombat Bow
Armor
  • Arms
  • Legs
  • Class item

Random drops, not guaranteed. Full loot table

Mechanics references: Shacknews · raid walkthrough · Destinypedia · raid overview and walkthrough · RaidSecrets · encounter research

Route to the next boss, with the secret chest
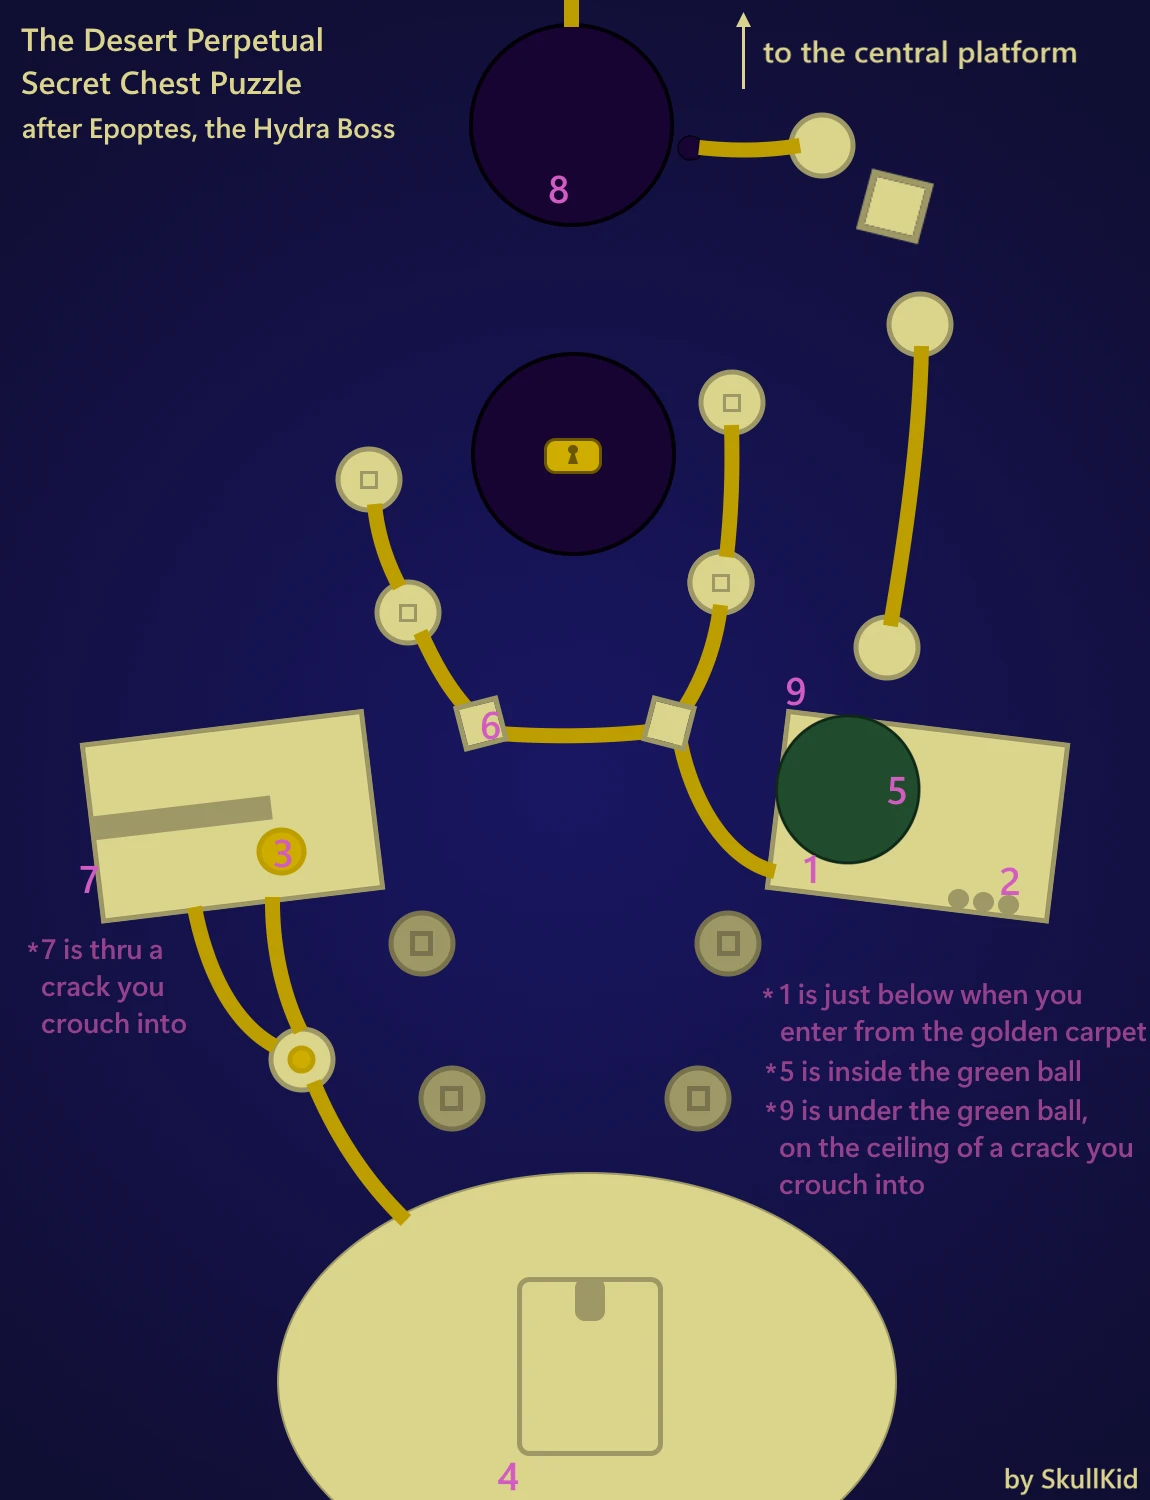
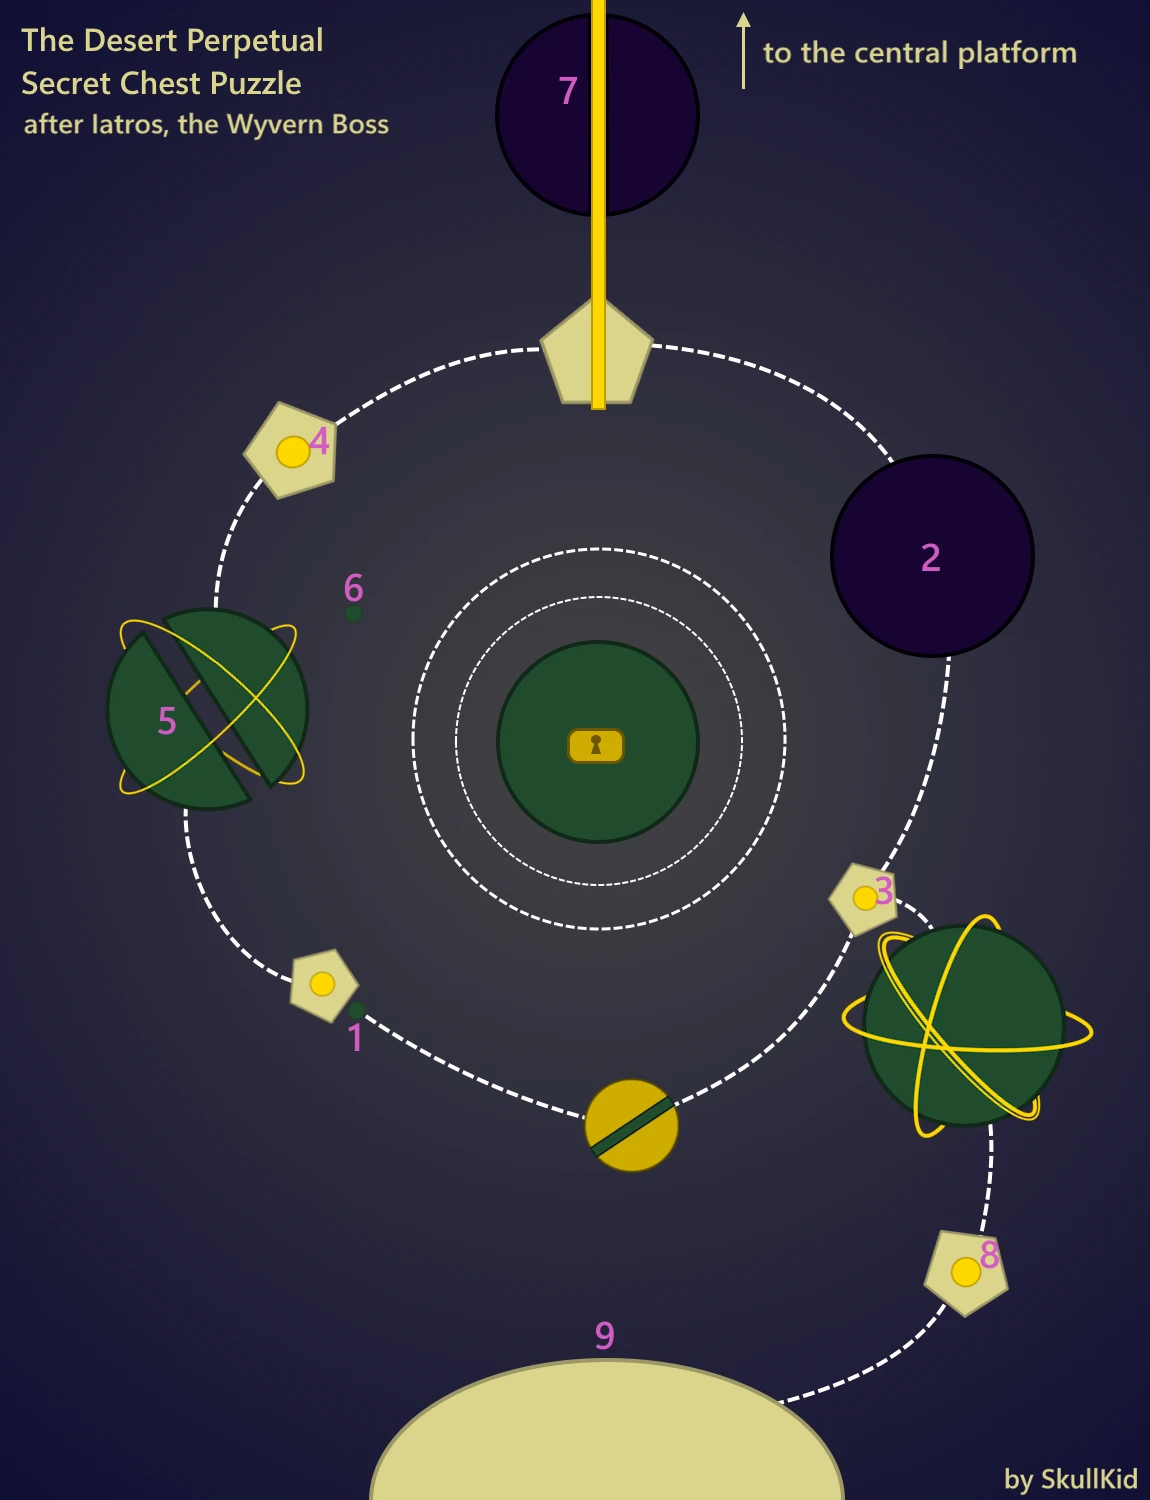
Route after Epoptes back to the central platform, with the secret chest
Route after Epoptes back to the central platform, with the secret chestRoute map: SkullKid (via Reddit)

The numbers mark where the glyphs can appear. Four of them, chosen at random, must be activated to open the secret chest, one of the three for the Ternary Gifts triumph.

Glyph key for the secret chest route maps
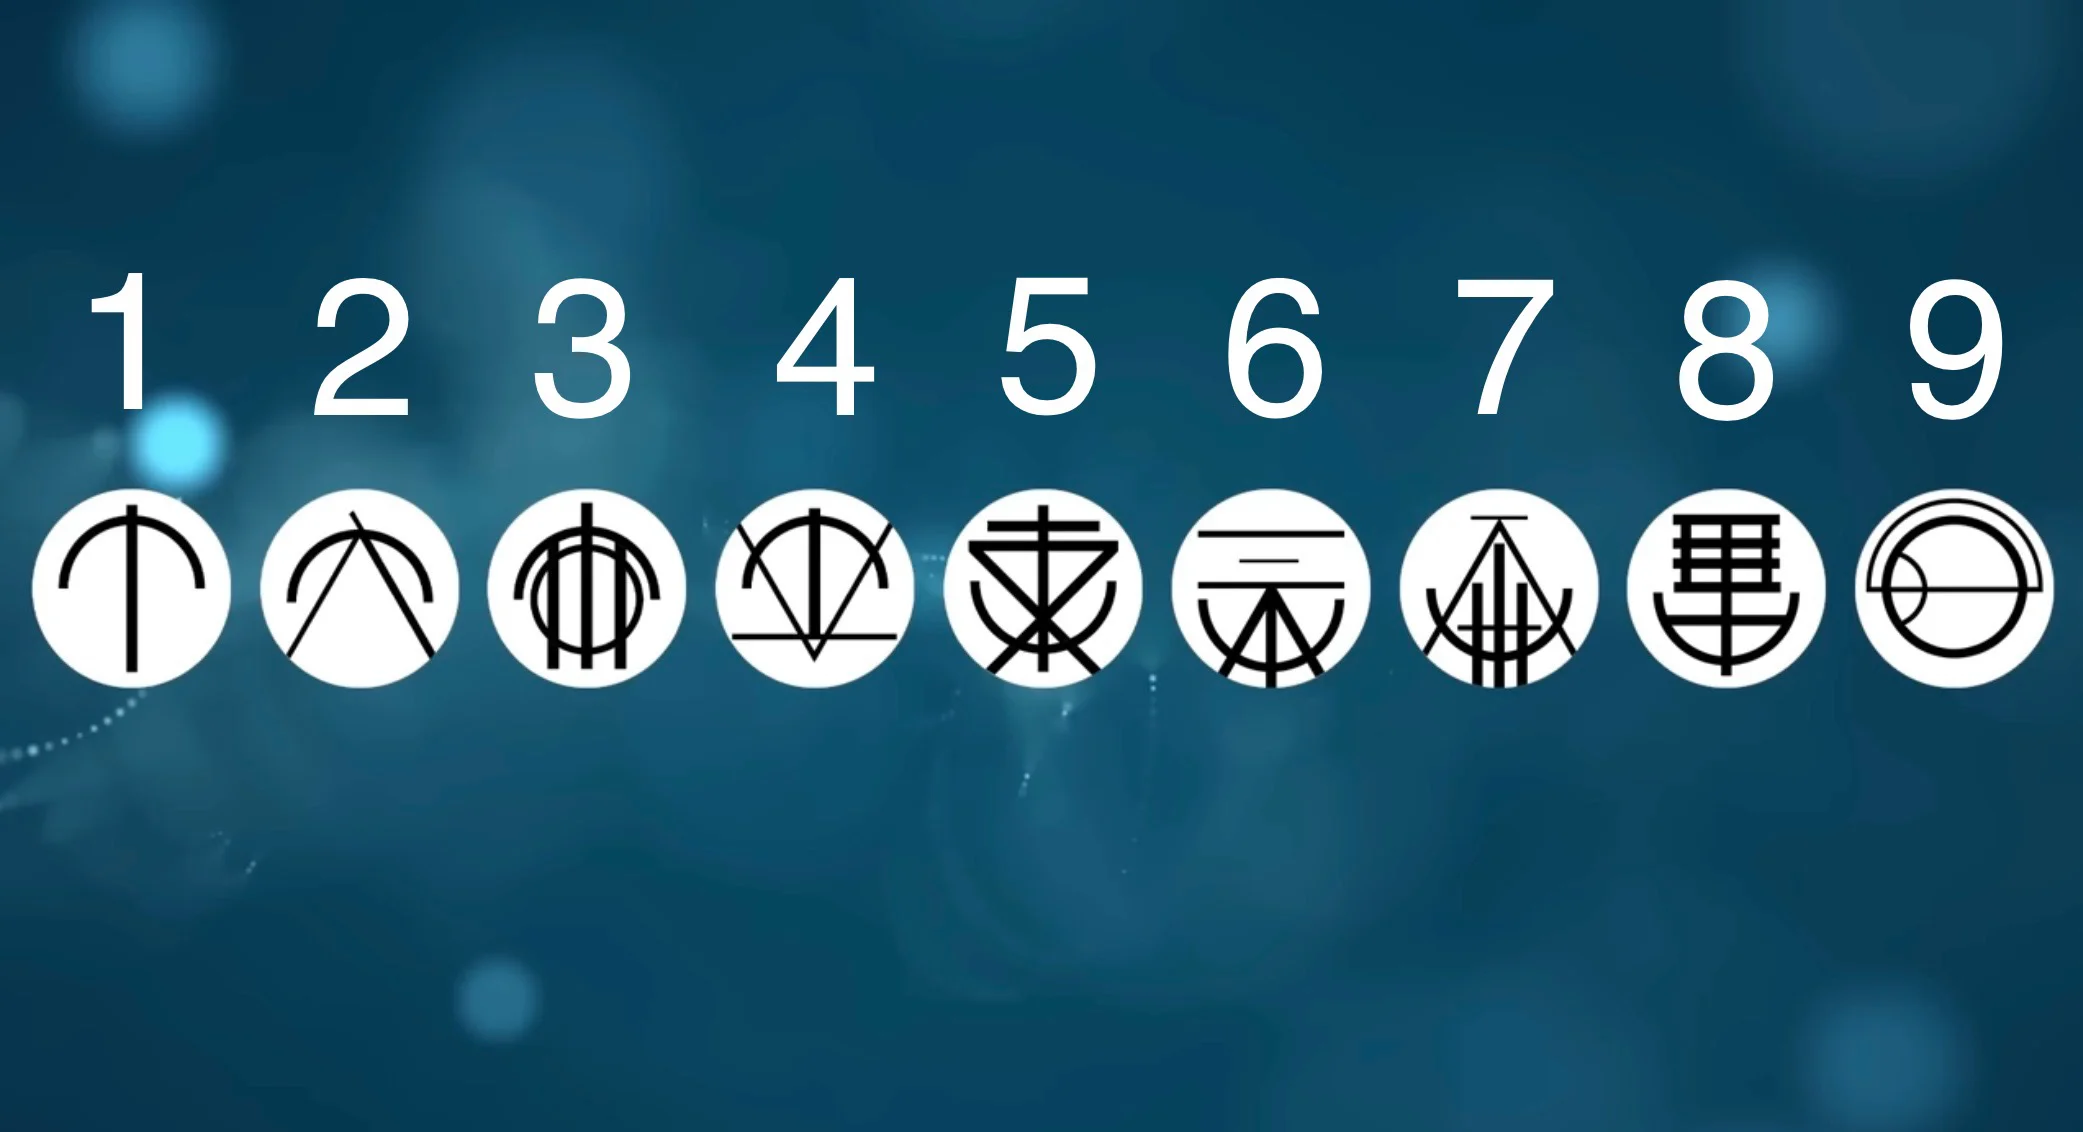
The nine glyphs, numbered to match the route maps
The nine glyphs, numbered to match the route mapsCommunity-made (via Reddit)

02 / WYVERN

Iatros, Inward-Turned

Keep the hourglass supplied while building a route for the climber.

Back to encounter list ↑
Iatros: cavern arena
Iatros: cavern arenaBungie · Destinypedia

Maps & diagrams

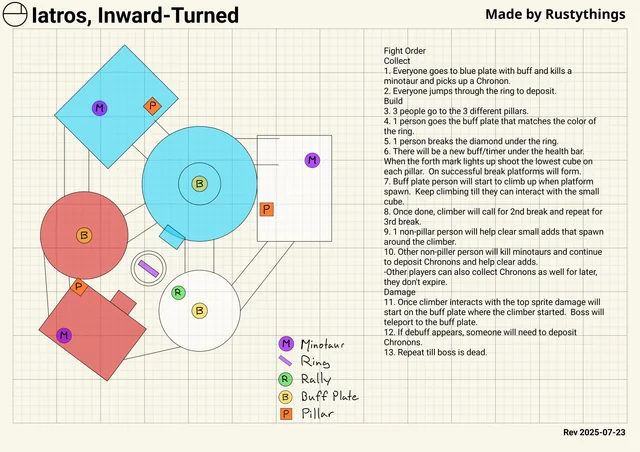
Iatros arena map, roles and fight order
Iatros arena map, roles and fight orderMap: Rustythings (via Reddit)

Encounter sequence

  1. Fill the hourglass

    Defeat the six opening Time’s Burden Minotaurs. Everyone collects a Chronon and jumps through the ring. After six deposits, shoot the diamond beneath the hourglass.

  2. Find the active plate

    The climber takes the lit plate and its buff. Shooters identify their own spires; bottom, middle, and top refer to box height, not the spire’s location.

  3. Shoot on four

    When Diastole reaches its fourth charge, all three shooters break their bottom boxes together. The climber ascends and completes the hologram interaction. Clear Imps that interrupt it.

  4. Build the remaining tiers

    Wait for the climber’s confirmation, then repeat for the middle boxes and finally the top boxes. Each tier replaces earlier platforms; the climber calls when the team may advance.

  5. Damage without neglecting time

    After the third interaction, regroup at the climber’s starting area to damage Iatros. Runners keep hunting Minotaurs and depositing Chronons. A draining hourglass still threatens the team during damage; repeat after immunity returns.

If the attempt breaks down
  • No usable staircase. Recheck box height and the fourth-charge timing.
  • Neomutation appears. A runner must deposit more time. Do not have everyone abandon the hourglass for damage.
Optional challenge: Encounter Challenges feat
  • Use three different climbers: each Guardian interacts with only one staircase hologram.
  • Only when the fireteam leader selects the Encounter Challenges feat before launch; a mistake wipes the team.

Challenge references: Vaexil · Normal-mode guide · Destinypedia · raid overview and walkthrough

Loot from this encounter
Weapons
  • Finite MaybeFusion Rifle
  • The When and WhereRocket Launcher
Armor
  • Helmet
  • Chest

Random drops, not guaranteed. Full loot table

Mechanics references: RaidSecrets · encounter research · Destinypedia · raid overview and walkthrough · Vaexil · Normal-mode guide

Route to the next boss, with the secret chest

Route after Iatros back to the central platform, with the secret chest
Route after Iatros back to the central platform, with the secret chestRoute map: SkullKid (via Reddit)

The numbers mark where the glyphs can appear. Four of them, chosen at random, must be activated to open the secret chest, one of the three for the Ternary Gifts triumph.

03 / HOBGOBLIN

Agraios, Inherent

Charge the rings and return the sniper shot to its source.

Back to encounter list ↑
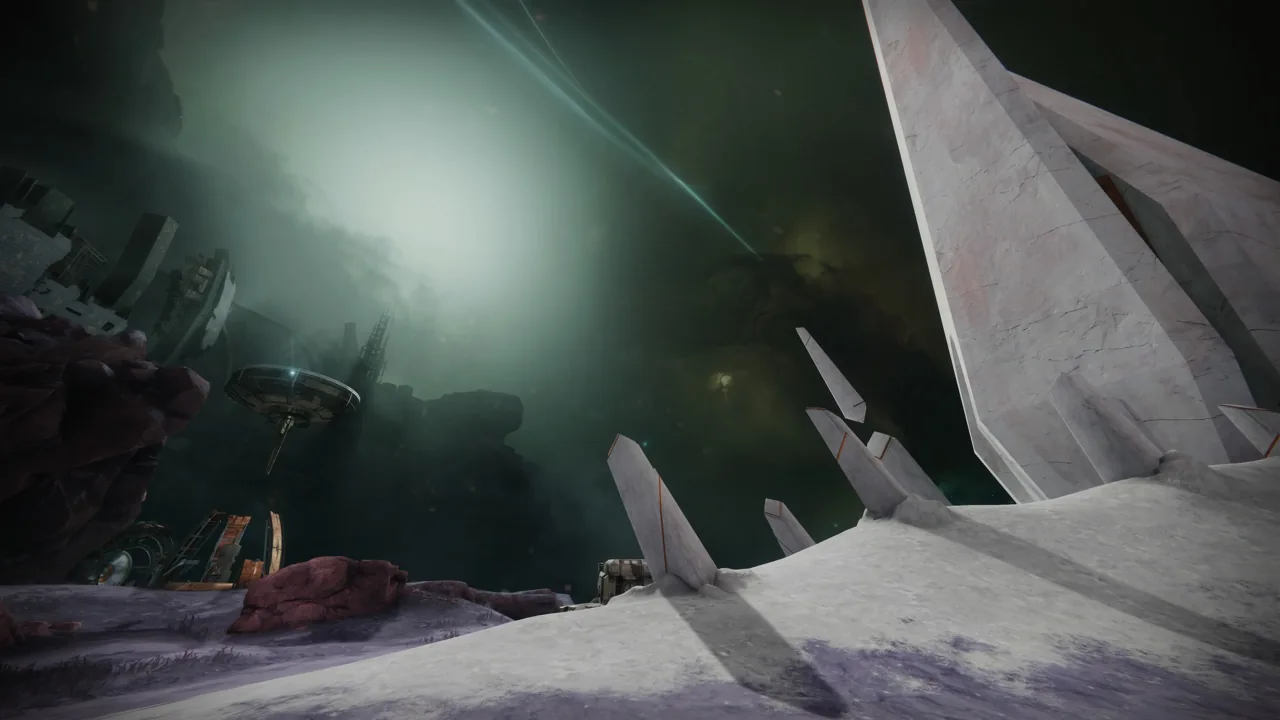
Agraios: arena
Agraios: arenaBungie · Destinypedia

Maps & diagrams

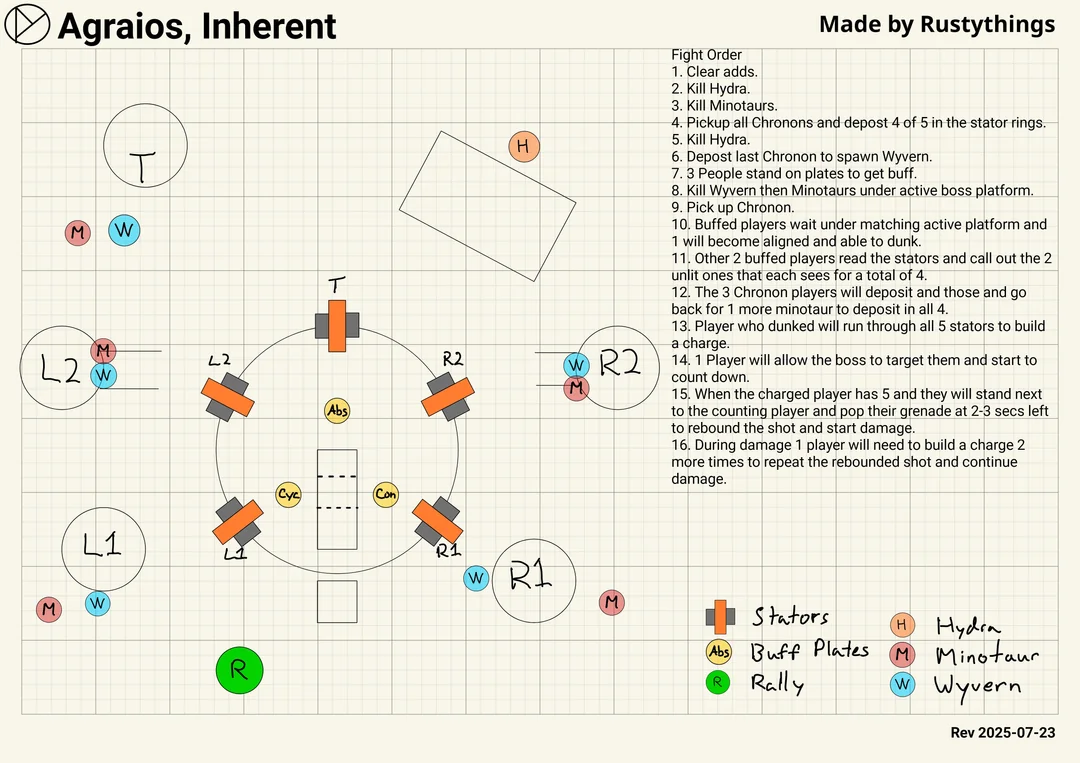
Agraios arena map, stators and fight order
Agraios arena map, stators and fight orderMap: Rustythings (via Reddit)
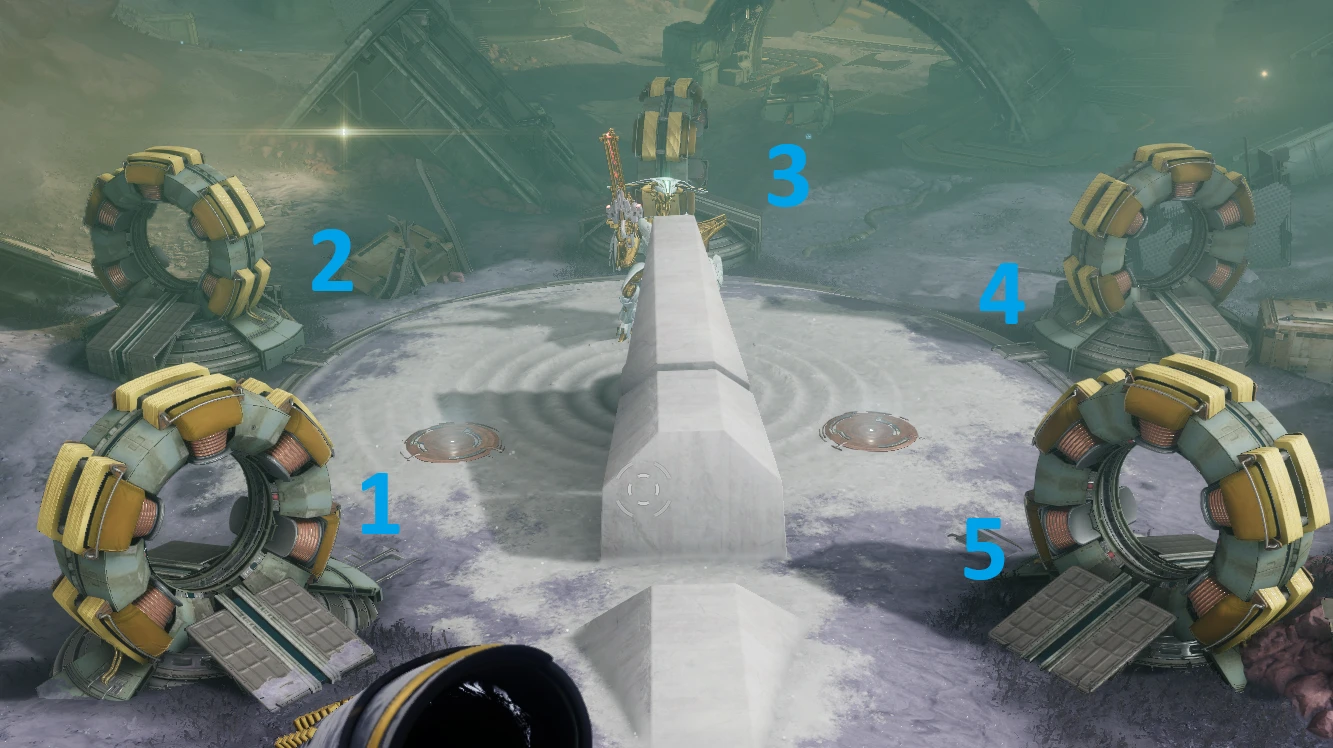
Agraios arena with the five rings numbered
Agraios arena with the five rings numberedScreenshot: Revelry clan

Encounter sequence

  1. Activate five rings

    Kill the Hydra, then the Minotaurs it enables. Deposit a Chronon through each ring. Number rings 1–5 clockwise from a shared landmark. Clear the Wyverns and collect the three plate buffs.

  2. Match the sniper

    Identify the active copy’s Temporality name. Its matching player interacts beneath that copy to gain Alignment. Break sightlines before Variable Elimination expires.

  3. Read four safe rings

    The other two Temporality players each call their two non-red rings. The unbuffed runners deposit Chronons into those four rings. Confirm each deposit; leave the fifth alone.

  4. Return the shot

    Once safe, the aligned player crosses all five rings to gain the grenade-slot detain ability. A designated teammate holds the sniper’s attention and counts down. Place the bubble in the shot’s path before impact; the deflection opens damage.

  5. Repeat the deflection during damage

    When Alignment returns, a designated runner crosses the five rings again. Bait and block the next sniper shot to extend damage. Two extensions provide three damage windows; restart mechanics when the phase ends.

If the attempt breaks down
  • Runner dies in a ring. Recheck the four safe calls and whether stabilization is complete.
  • Deflection misses. Keep one clearly identified target and agree on bubble placement before the pull.
Optional challenge: Encounter Challenges feat
  • Chronon pickups count for the whole team: no Guardian takes their next Chronon until all six have taken the same number.
  • Only when the fireteam leader selects the Encounter Challenges feat before launch; a mistake wipes the team.

Challenge references: Vaexil · Normal-mode guide · Destinypedia · raid overview and walkthrough

Loot from this encounter
Weapons
  • AntedateSubmachine Gun
  • IntercalaryAuto Rifle
  • Lance EphemeralSniper Rifle
Armor
  • Legs

Random drops, not guaranteed. Full loot table

Mechanics references: RaidSecrets · Agraios and Iatros guide · Soup Spoon · raid guide

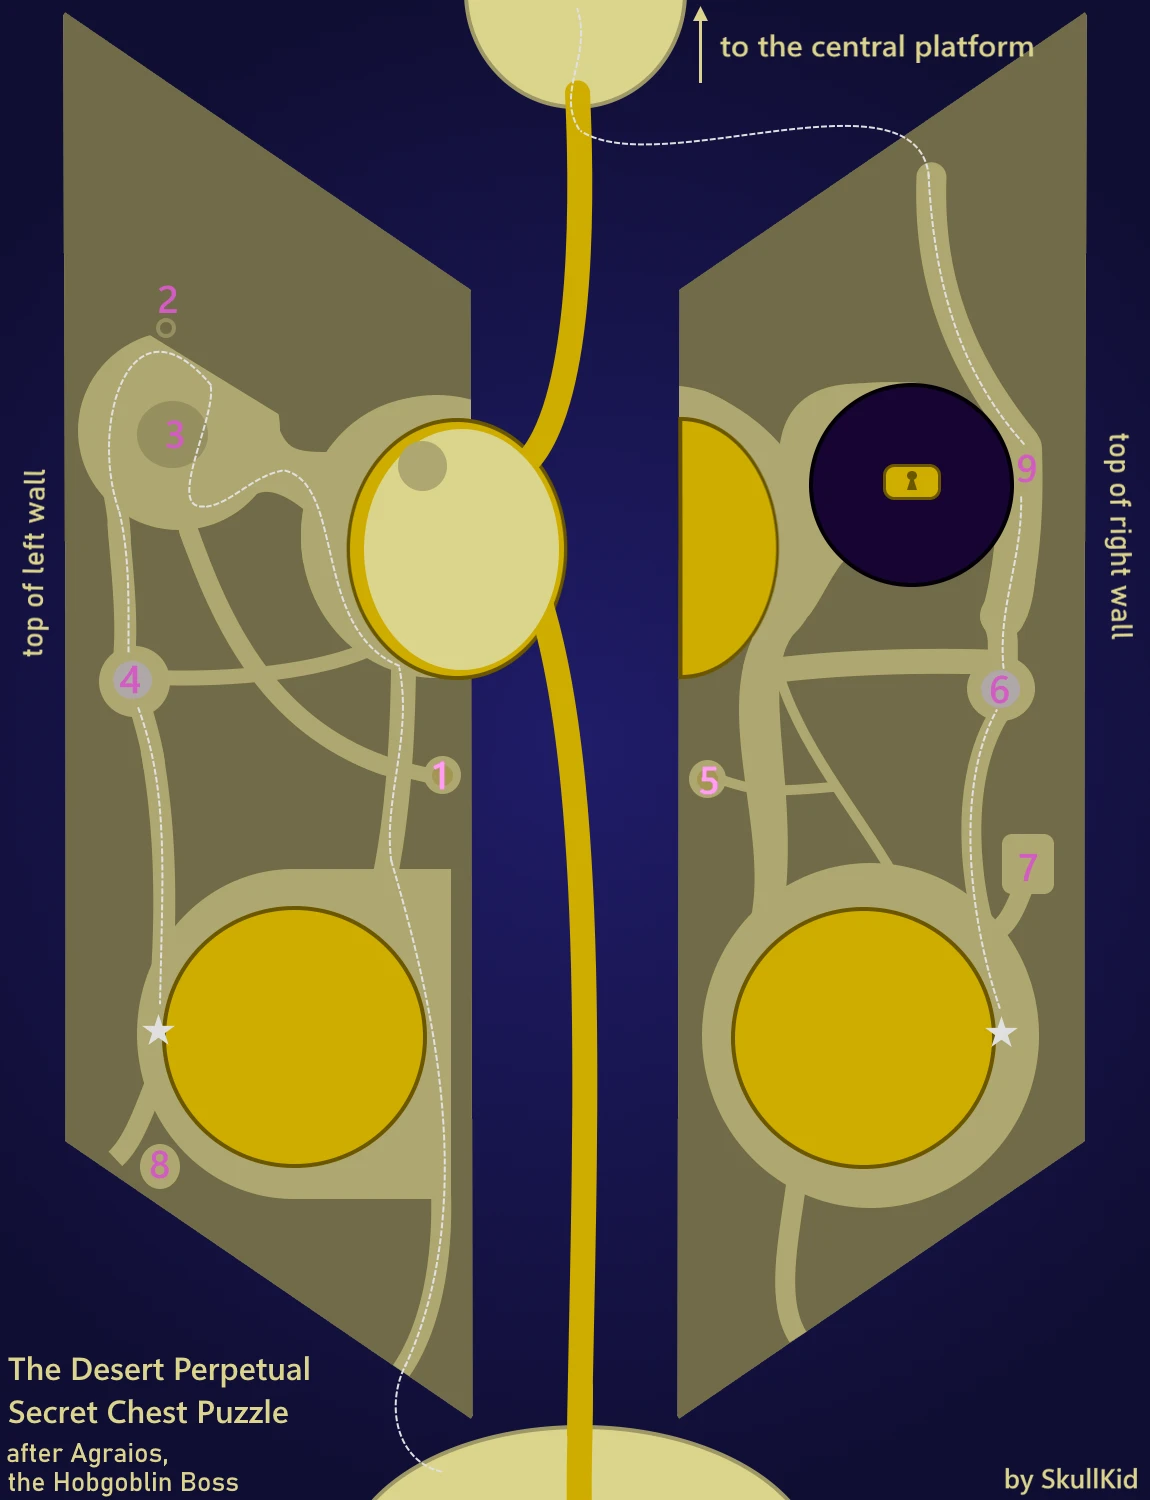
Route to the next boss, with the secret chest

Route after Agraios back to the central platform, with the secret chest
Route after Agraios back to the central platform, with the secret chestRoute map: SkullKid (via Reddit)

The numbers mark where the glyphs can appear. Four of them, chosen at random, must be activated to open the secret chest, one of the three for the Ternary Gifts triumph.

04 / FINAL BOSS

Koregos, the Worldline

Identify matching Chronons, solve the upper totems, and survive the finish.

Back to encounter list ↑
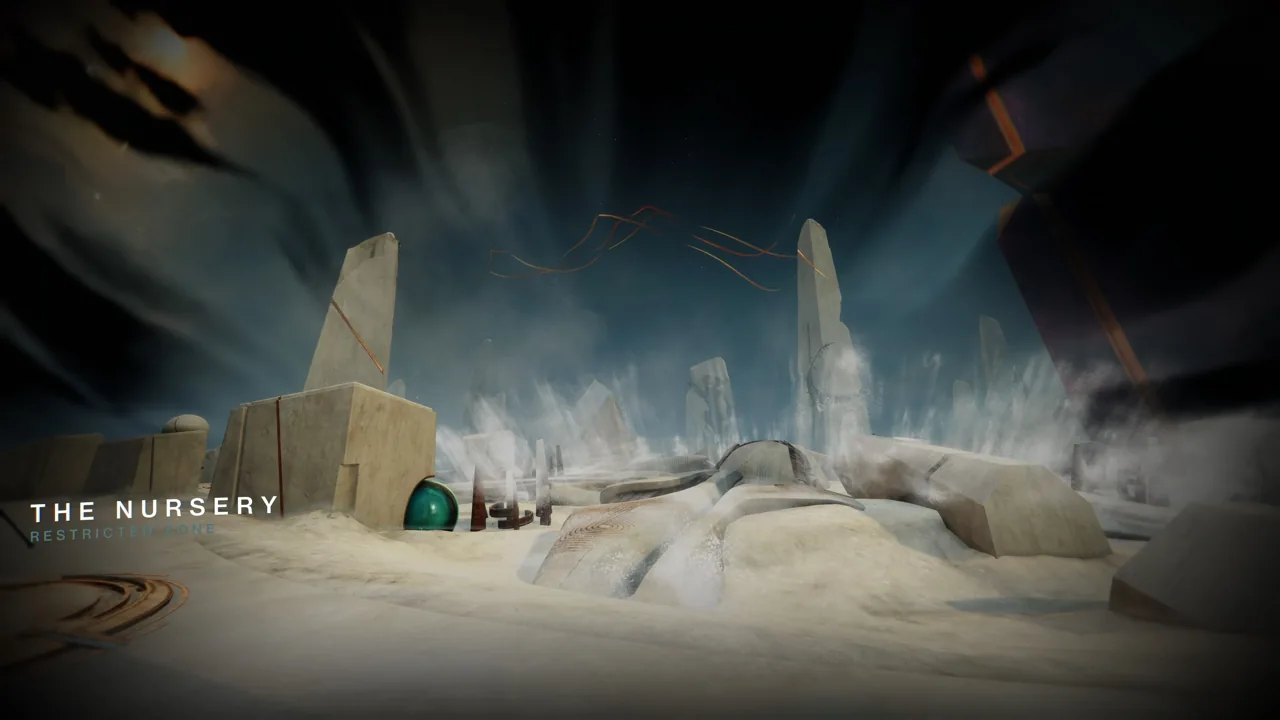
Koregos: the Nursery
Koregos: the NurseryBungie · Destinypedia

Maps & diagrams

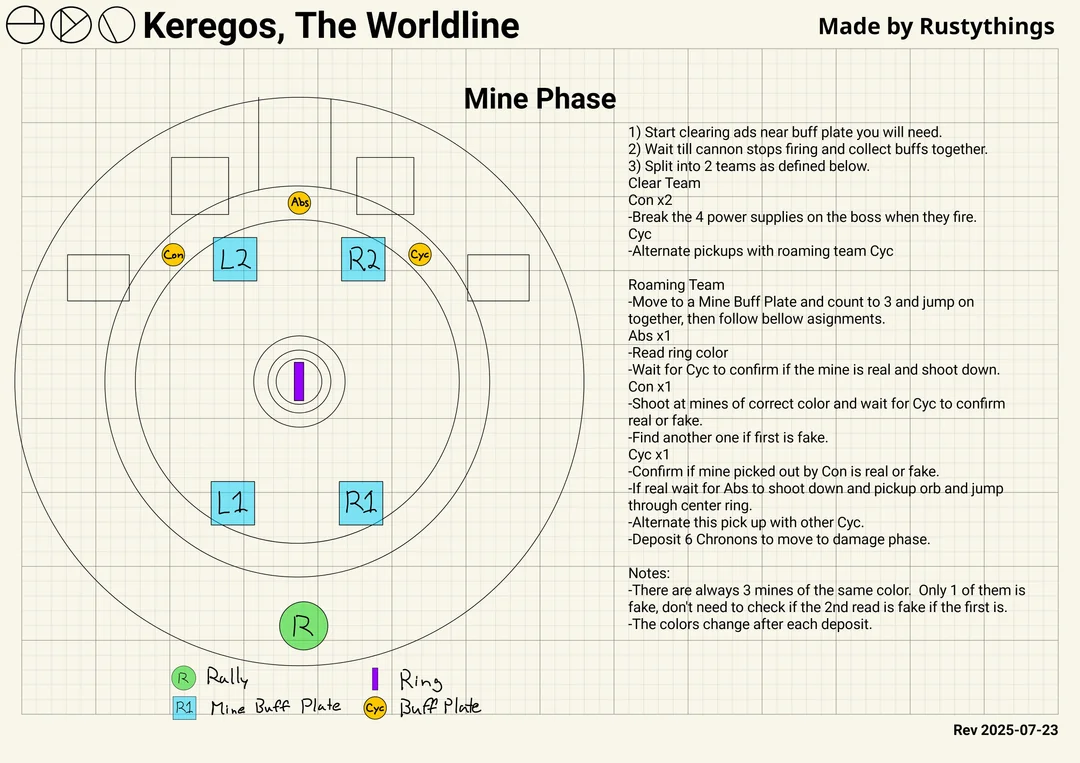
Koregos mine phase: teams, plates and ring
Koregos mine phase: teams, plates and ringMap: Rustythings (via Reddit)
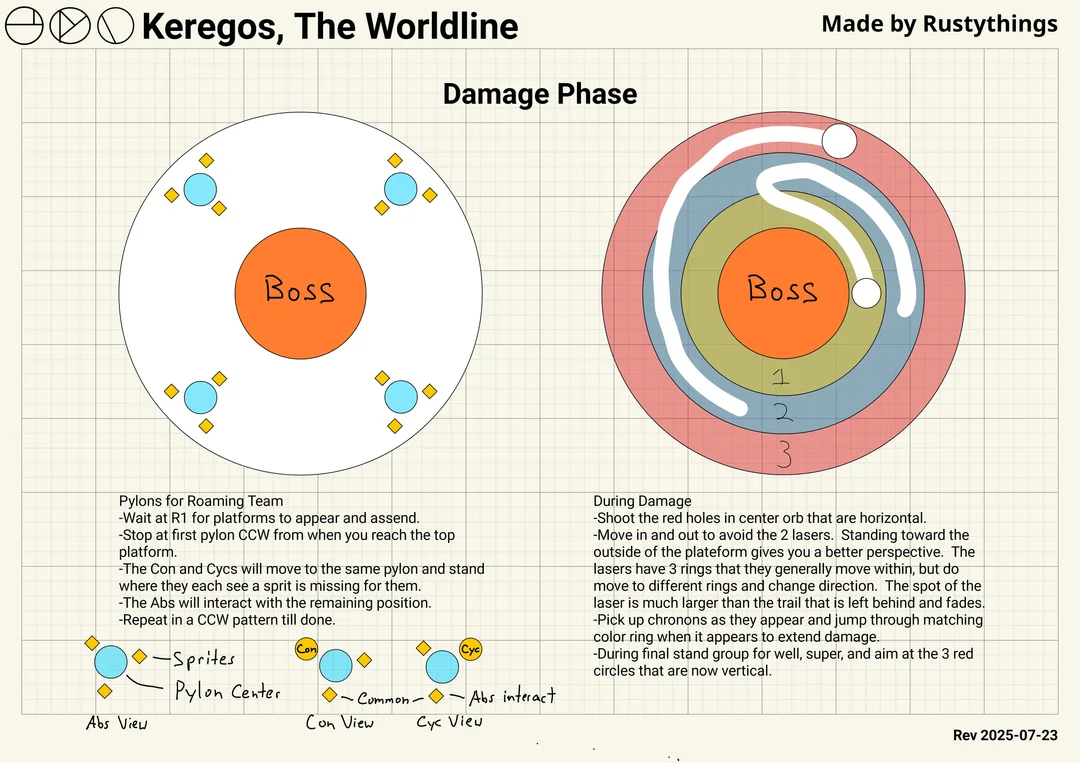
Koregos damage phase: pylons and laser rings
Koregos damage phase: pylons and laser ringsMap: Rustythings (via Reddit)

Encounter sequence

  1. Unlock your roles

    Kill the three Hydras and take the Temporality plates together. When Time’s Arrow charges, Constant players destroy all four glowing cannons to interrupt it and create Temporal Oculus pools.

  2. Combine the information

    Send a Constant, an Absolute, and the Cyclical carriers through the same Oculus pool together. Absolute reads the ring’s color. Constant identifies matching mine colors. Cyclical confirms which candidates glow. Absolute destroys only confirmed matches.

  3. Deposit six Chronons

    Cyclical carriers collect the matching drops and cross the hourglass ring on one countdown. Its requested color changes shortly after a deposit, so a late carrier risks dying. Recheck the next color and repeat until six deposits are complete.

  4. Ascend and solve four totems

    Shoot the diamond below the hourglass and climb. At each totem, Constant and Cyclical each call their two visible cube positions from the same facing. Absolute interacts with the position common to both views. Example: left + top and top + right means top. Repeat at all four.

  5. Maintain the damage window

    Shoot the horizontal red openings and avoid the rotating beams. Assign one runner to collect a Chronon matching each new portal and deposit it to extend damage. Reset for another cycle if necessary.

  6. Finish, then evacuate

    During final stand, aim at the now-vertical red openings. After the health bar empties, leave the damage platform immediately and keep moving until Decoherence Imminent clears.

If the attempt breaks down
  • Mine calls disagree. Do not shoot yet. Re-enter the same Oculus pool and compare one candidate at a time.
  • Totem calls seem impossible. Confirm everyone faces the same totem from the same side.
  • Boss is dead but the timer remains. Leave the platform; the kill animation is not the end of the danger.
Optional challenge: Encounter Challenges feat
  • In every mechanic phase, all six Guardians each deposit one Chronon through the hourglass ring.
  • Only when the fireteam leader selects the Encounter Challenges feat before launch; a mistake wipes the team.

Challenge references: Vaexil · Normal-mode guide · Destinypedia · raid overview and walkthrough

Loot from this encounter
Weapons
  • AntedateSubmachine Gun
  • Finite MaybeFusion Rifle
  • IntercalaryAuto Rifle
  • Lance EphemeralSniper Rifle
  • Opaque HourglassCombat Bow
  • The When and WhereRocket Launcher
  • Whirling OvationRocket Launcher · Exotic
Armor
  • All slots

Random drops, not guaranteed. Full loot table

Mechanics references: Soup Spoon · raid guide · Vaexil · Normal-mode guide · RaidSecrets · Koregos discussion

Choose the next objective.

Any version

End of the Worldline

Complete the raid.

  • Agraios defeated
  • Epoptes defeated
  • Iatros defeated
  • Koregos defeated

RewardThird Unknown emblem

Any version

Combined Mastery

Complete the raid.

  • Agraios defeated
  • Epoptes defeated
  • Iatros defeated
  • Koregos defeated

Feats

Feature Presentation

Complete all encounters with feats active. Does not advance the title.

  • Complete with five feats active

RewardSoloist Shell; additional feat slot

Any version

Death-Defiant

Complete every encounter without a fireteam death or return to orbit.

  • Full raid completed

RewardMediant Flourish shader

Feat

Brutal Efficiency

Complete encounters with Phase Race active.

  • Agraios defeated
  • Epoptes defeated
  • Iatros defeated
  • Koregos defeated

RewardIncreased Whirling Ovation drop rate

Feat

This Is War

Complete encounters with Cutthroat Combat active.

  • Agraios defeated
  • Epoptes defeated
  • Iatros defeated
  • Koregos defeated

RewardIncreased Whirling Ovation drop rate

Feat

Battling Battalions

Complete encounters with Battalions active.

  • Agraios defeated
  • Epoptes defeated
  • Iatros defeated
  • Koregos defeated

RewardIncreased Whirling Ovation drop rate

Feat

Cherished Lifetimes

Complete encounters with Token Limit active.

  • Agraios defeated
  • Epoptes defeated
  • Iatros defeated
  • Koregos defeated

RewardIncreased Whirling Ovation drop rate

Feat

Challenging Victory

Complete encounters with Encounter Challenges active.

  • Agraios defeated
  • Epoptes defeated
  • Iatros defeated
  • Koregos defeated

RewardIncreased Whirling Ovation drop rate

Epic

In Perpetuity

Complete the Epic raid.

  • Agraios defeated
  • Epoptes defeated
  • Iatros defeated
  • Koregos defeated

Epic feats

Ne Plus Ultra

Complete Epic encounters with feats active. Does not advance the title.

  • Agraios defeated
  • Epoptes defeated
  • Iatros defeated
  • Koregos defeated

Epic

Death-Defiant II

Complete Epic without a fireteam death or return to orbit.

  • Full Epic raid completed

Record labels and visible rewards transcribed from the Braytech screenshot supplied by Gideon; check the linked title records for the complete requirements. Empty markers mean status unavailable.

Encounter loot

Encounter drop pools · individual drops are random
BossWeaponsArmor
Epoptes
  • Opaque Hourglass
Arms, legs, class item
Iatros
  • Finite Maybe
  • The When and Where
Helmet, chest
Agraios
  • Antedate
  • Intercalary
  • Lance Ephemeral
Legs
Koregos
  • Antedate
  • Finite Maybe
  • Intercalary
  • Lance Ephemeral
  • Opaque Hourglass
  • The When and Where
  • Whirling Ovation
All slots

Collection

All 27 items Bungie’s game data credits to this raid (source: "The Desert Perpetual" Raid). Which encounter drops what is in the table above. Fetched 29 September 2026.

Weapons 7

  • Whirling OvationRocket Launcher · ExoticDrops from Koregos
  • AntedateSubmachine GunDrops from Agraios · Koregos
  • Finite MaybeFusion RifleDrops from Iatros · Koregos
  • IntercalaryAuto RifleDrops from Agraios · Koregos
  • Lance EphemeralSniper RifleDrops from Agraios · Koregos
  • Opaque HourglassCombat BowDrops from Epoptes · Koregos
  • The When and WhereRocket LauncherDrops from Iatros · Koregos

Titan armor 5

  • Collective Psyche GauntletsGauntletsDrops from Epoptes · Koregos
  • Collective Psyche GreavesLeg ArmorDrops from Epoptes · Agraios · Koregos
  • Collective Psyche HelmHelmetDrops from Iatros · Koregos
  • Collective Psyche MarkTitan MarkDrops from Epoptes · Koregos
  • Collective Psyche PlateChest ArmorDrops from Iatros · Koregos

Hunter armor 5

  • Collective Psyche CasqueHelmetDrops from Iatros · Koregos
  • Collective Psyche CloakHunter CloakDrops from Epoptes · Koregos
  • Collective Psyche CuirassChest ArmorDrops from Iatros · Koregos
  • Collective Psyche SleevesGauntletsDrops from Epoptes · Koregos
  • Collective Psyche StridesLeg ArmorDrops from Epoptes · Agraios · Koregos

Warlock armor 5

  • Collective Psyche BondWarlock BondDrops from Epoptes · Koregos
  • Collective Psyche BootsLeg ArmorDrops from Epoptes · Agraios · Koregos
  • Collective Psyche CoverHelmetDrops from Iatros · Koregos
  • Collective Psyche GlovesGauntletsDrops from Epoptes · Koregos
  • Collective Psyche RobesChest ArmorDrops from Iatros · Koregos

Cosmetics 5

  • Soloist ShellGhost Shell · Exotic
  • Envoy's TogsShader
  • Mediant FlourishShader
  • Third UnknownEmblem
  • Timeline's BladeEmblem

PC Gamer · encounter loot table · Rocketbiscuits & Blueberries.gg · raid loot table infographic

Sources & scope

Written as a concise teaching guide from the references below. Role splits and the reading order are recommendations. This is a source-reviewed draft for fireteam testing; it has not been verified through an ARG playthrough.

Normal-mode mechanics only. Epic, feat strategies beyond the encounter challenge notes, secret-chest routes, and the complete seal checklist are separate guide topics.

Give the next run a purpose.

Compare raid progress before you rally.

Open Fireteam ↗